


The idea to “junk your pumpkin” is certainly not new, but it is far too cool not to share with you this Halloween season, so hopefully it will be new to you! Does anyone else out there loathe the process of carving pumpkins? The smell or the stringy, slimy feel of scooping out the pumpkin seeds? All that work and mess (and time!), and you end up with pretty much the same toothless cast of characters as everyone else on your block! Or how many of you abandon your noble pumpkin-carving ambitions and just stash the plain pumpkins on the porch at the last minute, feeling defeated?
Sure, you can carve your pumpkins the traditional way, but if you want your kids to be much more involved in actually doing the work, and you want them to make something memorable for the little trick-or-treaters in the ‘hood, we suggest going to the garage and digging through some old tool boxes to find hardware (obscure, unfamiliar items that were once used to fix things back in the olden days) to jazz up your jack-o-lanterns!
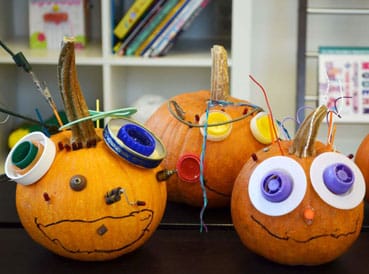
“Junk-o-Lanterns”, or “Stuff-on-a-Pumpkin” as we affectionately like to refer to this craft, is one of the few projects where the name, in and of itself, tells you pretty much everything you need to know in order to make one! But let’s walk through it anyway:
You Need:
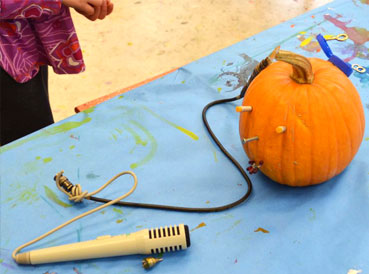
- Lots of hardware. Nails, screws, nuts, bolts, fasteners, springs, electrical stuff, clamps, wire. You name it! Raid the kitchen junk drawer, but please do not disassemble any device (particularly a functioning one) without parental permission!
- Random odds and ends such as water bottle lids, soda bottle caps, buttons, etc.
- Wire cutters
- Pliers
- Hammer
- Hot glue gun. With parental supervision of course.
How to Do It:
1. First, sort through your pile of loot and start experimenting with laying out your hardware on the table to determine what you’d like to use for hair, eyes, mouth, teeth, etc. Rearrange everything until you achieve a sufficiently ghoulishly looking character.
2. Because the pumpkin is so soft, much of the hardware can simply be inserted into the pumpkin by hand with minimal effort. Firmly poke the nails, screws, wire, etc. into the pumpkin and use a lightweight hammer if necessary. We’re not trying to disfigure these little guys, so easy does it!
3. Using the hot glue gun, glue items such as plastic lids, nuts, washers, etc. directly to the pumpkin.
4. We suggest making a whole cast of characters with different personalities and facial expressions (happy, sad, goofy, scary, etc.)!
5. A really nice bonus to this project is that when it’s time to throw out your pumpkin, you can salvage most of the junk and save it for next year’s pumpkins!

-
[…] My Halloween aesthetic isn't for everyone. I like things that are scary and strange, things that a lot of "normal" folks might not appreciate. I have a feeling that my adoration for this junk-o-lantern from Small Hands Big Art might fall into that love-it-or-loathe-it category. It kind of reminds me of the styling of the robots in the movie "Robots." This is a great way to use up some of those random odds and ends that you've been saving because you knew that someday they would come in handy. Connoisseurs of the junk drawer, someday has arrived! [how to make a junk-o-lantern] […]
Junky jack-o-lantern from Small Hands Big Art.
[…] Use odds and ends and let the kids make their very own “Junk-O-Lantern” via Small Hands Big Art […]
[…] Junk-O-Lanterns Small Hands Big Art […]
Leave a Comment
Great ideas and tutorial. i love it, thanks for sharing.