What do you do on a super busy Tuesday afternoon when you’re supposed to be crossing 150 items off the “to do” list (most of them carried over from the prior week)? Well, if you’re like us, you obviously stop the important work that you’re doing and start grabbing random objects from around the studio, trying to fashion them into a Christmas tree.
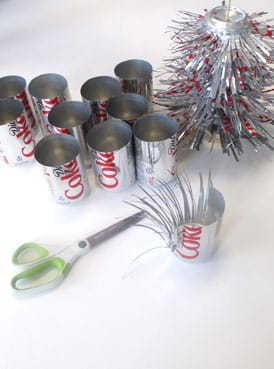
Suddenly inspired by Katie’s pile of coke cans sliced into Douglas Fir branches, you Google the heck out of her brilliant idea, which seems too clever and cute to not already be all over the Pinterest boards. Upon finding nothing similar, in a creative spurt, you “beast” it out (as Katie would say). Then when Katie runs off to teach a class at a local elementary school, you waste at least another hour obsessively taking 453 pictures of it from all different angles and lighting conditions. A day in the life. And we wonder why we can’t get anything done.


You Need:
- Soda cans + 5-10 pull tabs
- Scissors
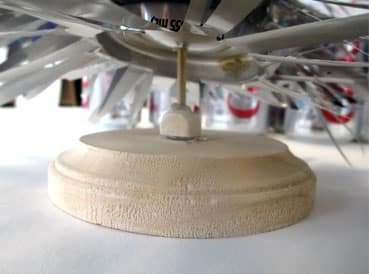
- Wooden Skewer, 12-14 inches long
- Small chunk of wood (for base)
- Nuts / bolts (for top of tree)
- Cutting board
- Hammer + 2 penny nail

How to Do It:
- Cut tops off of the aluminum cans (this should be done by an adult)
- Holding the base of the can, use the scissors to cut very thin strips in the can all the way to the bottom of the can where it curves.
- Gently fan out the strips from the base of the can.
- Lay the can on the cutting board with the bottom facing up and use the scissors to poke a small hole in the center of the can. The hole should be smaller than the size of the skewer, so that when placed on the skewer, the can will sit snuggly.
- Trim the “fringe” of the cans so that they gradually get shorter. When you place the cans on the skewer, you need about four each of every length.
- Place the nail in the center of the wood base and hammer it about half-way through. Gently work the skewer into the hole in the base until it is firmly attached. If the nail hole is bigger than the skewer, use a dab of hot glue in the hole to secure. We had to use hot glue in ours, and we also attached a wooden bead around the skewer for extra support. Experiment with what works.
- Slide the cans on the skewer in the order of largest to smallest width (so the bottom of the tree is full and the top of the tree tapering into a point), with the bottom of the cans facing up (so the opening of the can is facing the wood base). Plan on stacking about 15 – 20 cans to complete the tree.
- When you reach the top of the tree, arrange pull tabs & nuts and bolts from largest to smallest to form a point. Use hot glue at the top to secure the final nut or bolt.