Back in the day, it used to be a complete mystery exactly how Santa found out whether you had been naughty or nice. Electronic surveillance? Mandatory parental quarterly reporting? We may not have known quite where the big guy was getting his information, or who was ratting us out, but just the daunting awareness that Santa had his big frostbitten finger on the pulse of every kid on the planet was strong motivation for us to be on our best behavior at all times, or at least during the last two weeks of December. Keep reading to find out how to make this adorable Elf on a Shelf Craft Tutorial!
Today’s younger generation has the benefit of full disclosure from the North Pole. These days it is common knowledge that there are special “scout” elves that have been dispatched by Santa to keep a sharp eye out and report back to the home office. These rather sedentary elves often hide in plain sight, preferring to lounge on shelves vs. chairs or pillows, and often go by inconspicuous names like Dave or Kevin.
Sure, you can trust your fate to whatever little elf was randomly assigned to your case, and hope that he doesn’t play favorites or accept bribes from your little sister. But if you prefer more control when it comes to the unbiased reporting of what an absolute angel you are, we suggest that you make your own “elf on a shelf” so that you can closely monitor the flow of information to the North Pole and maximize your chances of finding everything on your Christmas list under the tree on Christmas morning!
You Need:
- A small recycled box for the elf’s body
- Newspaper or scrap paper
- Masking tape
- Tempera paint
- Glue
- Glitter
- Four pipe cleaners or wires to form the arms and legs
- Beads, buttons, collage materials, bells and other do-dads
- Fabric scraps and yarn
How to Do It:
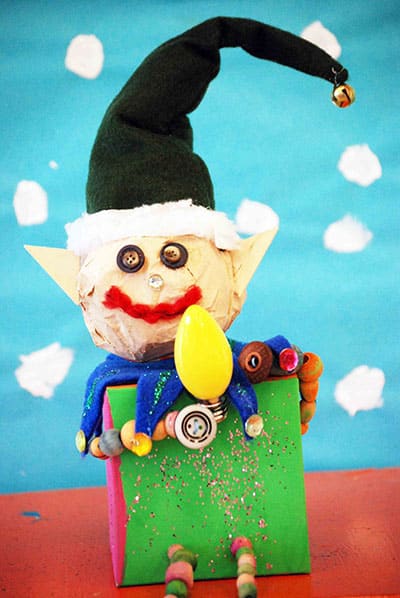
- Start by making the head by rolling newspaper in to a small ball and wrapping tightly with masking tape until round and smooth.
- Next, make the body out of the box. The top of the box with the lid will be where the head will be attached, and the bottom of the box will sit on the shelf. The legs will extend out from the front of the box. Carefully poke small holes in the side of the box, one on each side (for the arms), and two in the front of the box.
- Tie a small knot in one end of each of the four pipe cleaners, and with the lid off the box, thread the pipe cleaners through the arm and leg holes so that the knots are secured inside the box.
- Before attaching the head to the box, paint the box with tempera paint and sprinkle with glitter as desired. Let dry.
- Paint the head separately so that all the masking tape is covered and let dry.
- String beads and buttons on the pipe cleaner arms and legs. Get creative when making the “hands” and “feet” – you can use big beads or buttons, or wrap pieces of fabric to form the elf’s shoes. We’re not sure why, but elves generally have very knobby knees.
- Glue the head on the lid of the box. Hot glue works best, but school glue will work fine if allowed to dry sufficiently. Glue on yarn for hair, beads, buttons, etc. for the face. Don’t forget the ears!
- At this point, your elf is ready to get dressed up! You can make a hat out of fabric, felt or paper, and tie a little bell on the end of it. Fashion an outfit and scarf for your elf based on his unique style and color preferences.